The machine's wiring became pre-built cable assemblies
Before today the wiring plan leaned on pre-crimped pigtails meant for field repair
After today, it's a replace-the-assembly harness — cut-to-length all-black silicone wire in black braided sleeve, ferruled into the tool-free wire connectors, with the wire, sleeve, and ferrule kit bought (color held in reserve for AC mains)
The surface-mount board became the only board
Before today the controller was two boards — a through-hole carrier already in production and a machine-built surface-mount successor just begun
After today, it has one board, the conversion carried to its last part:
The bare ESP32 chip (the controller's brain) soldered flat to the board, in place of its plug-in module
The clock, the display's serial link, and the 3.3-volt regulator all redrawn as catalog surface-mount parts
The old hand-soldered carrier deleted — one board going forward, with the pin-map guard and the trace router pointed at it
Board to Fab and SMD Successor
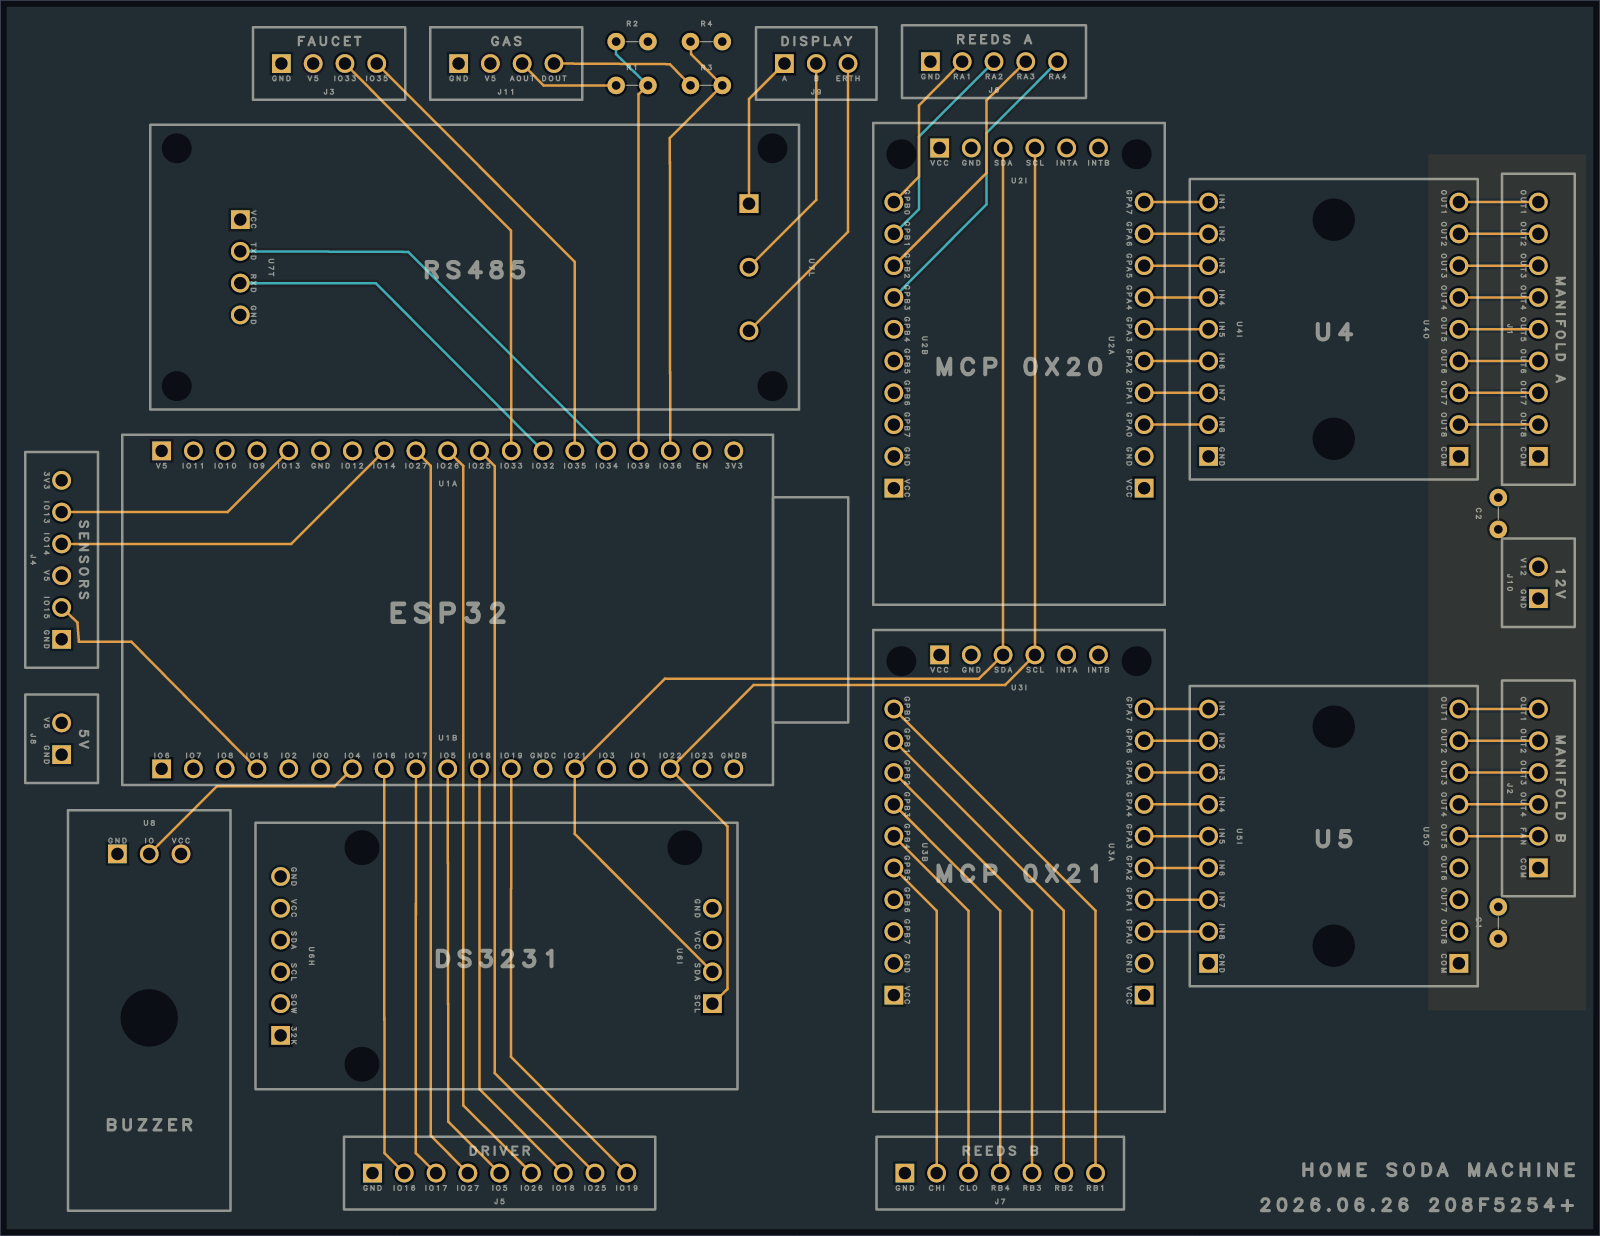
The controller board went out for fabrication
Before today the four-layer board was routed and named but had never been sent to a board house
After today ten copies are in production — a soda-glass brand logo added to the silkscreen and the bulk smoothing capacitor pulled onto the board just before it shipped ($122.17 for the run)
A machine-assembled successor board started
Before today the controller board was a through-hole carrier — its modules and parts hand-soldered in-house after the bare board arrives
After today, it has a successor the board house builds entirely by machine:
Every plug-in module redrawn as bare surface-mount silicon, each part matched to a real in-stock catalog number
The off-board connectors left as through-hole parts the same house solders, so nothing comes back for hand-assembly
The factory's files — a bill of materials and a pick-and-place list — written on every build, the conversion proven part by part
Funnel Mold and Board
The funnel mold's spout pin seals the floor
Before today the spout pin sat in its floor register with a 0.15 mm slip
After today the pin press-fits at zero, the PETG-on-PETG joint sealing the seam so silicone can't bleed under it at the cast's lowest point
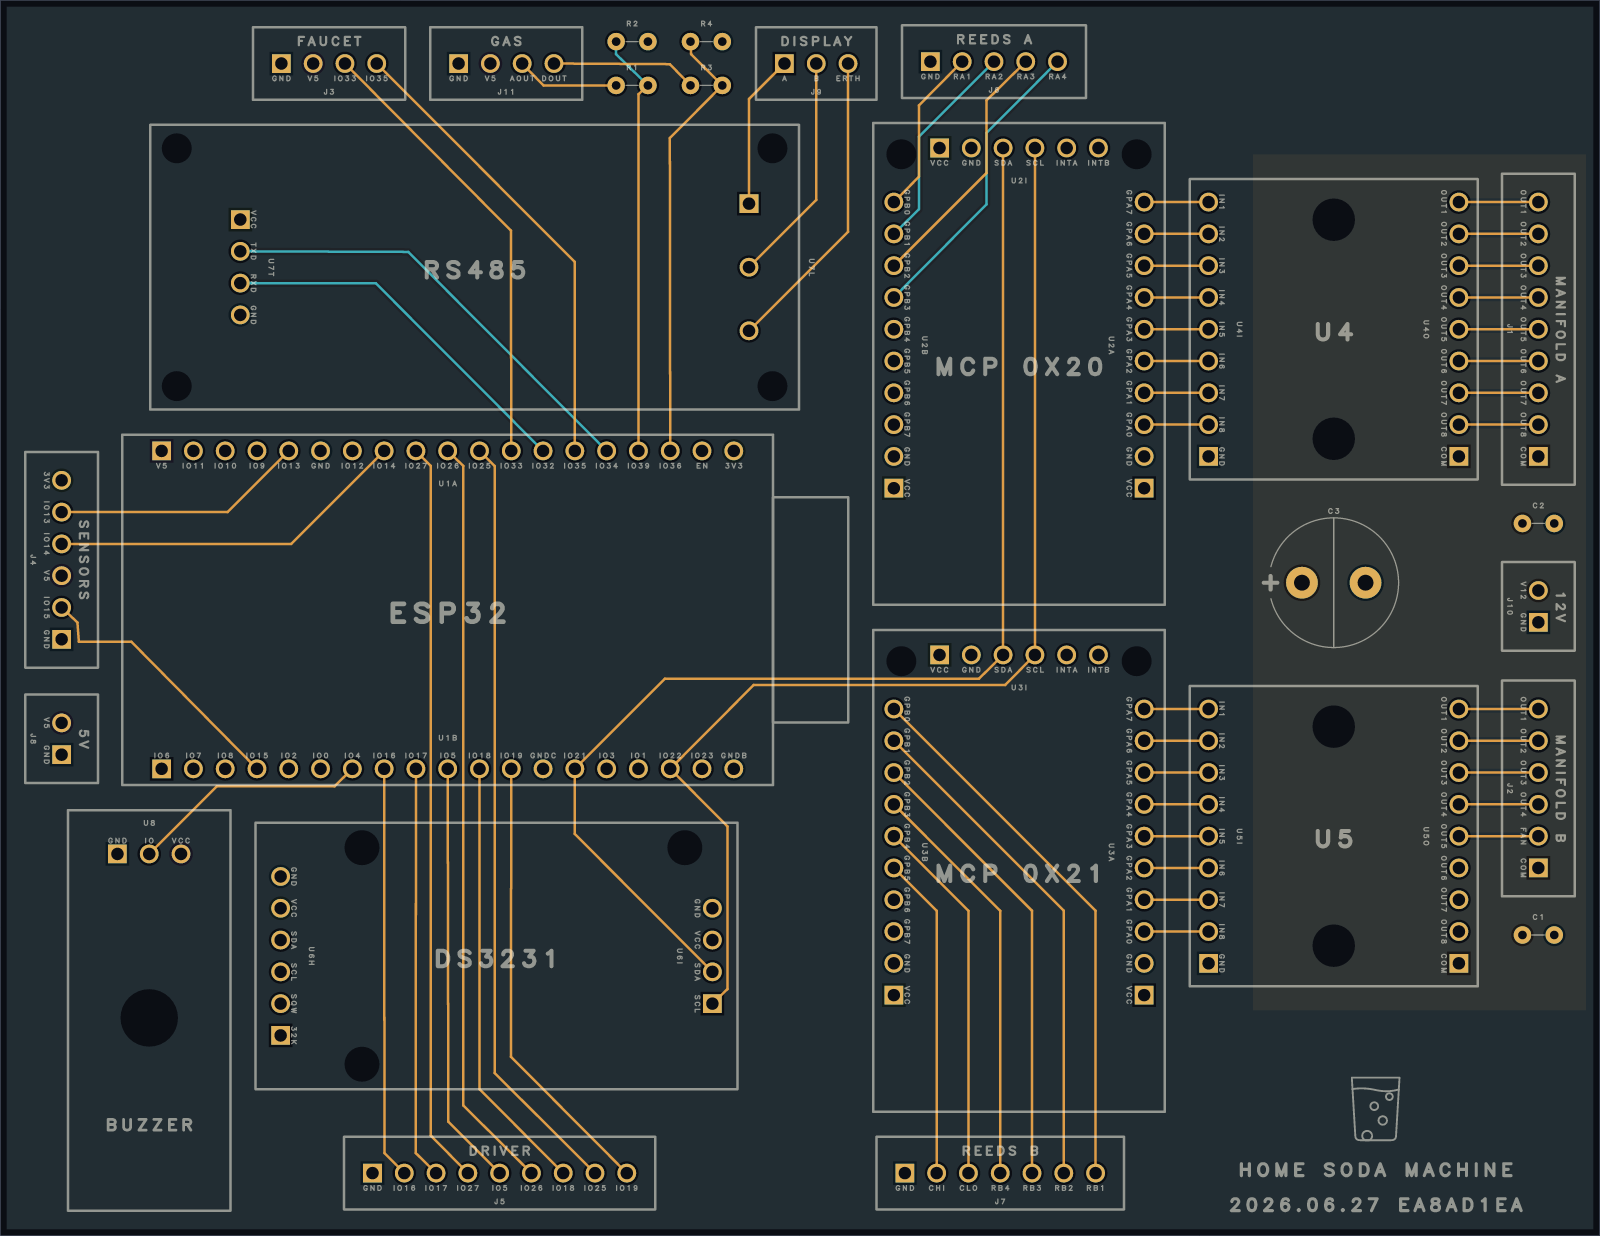
The controller board became a via-free four-layer carrier
Before today the board was wired but routed with vias across two copper layers
After today, it has:
Every net maze-routed to zero vias on a four-layer stack, inner planes added for the 3.3- and 5-volt rails
The placement tightened to a uniform 2 mm grid, the outline pulled in to 131 × 102 mm
A silkscreen identity — four-character pin labels reading inward and a nameplate stamping the board's name and version
Board and Pin Map
The pin map got one source of truth
Before today the board's pin assignments lived across four hand-kept docs that had quietly drifted apart
After today, the board itself is the one source of truth, with a guard script that fails if the bill of materials, the pinout, and the board disagree
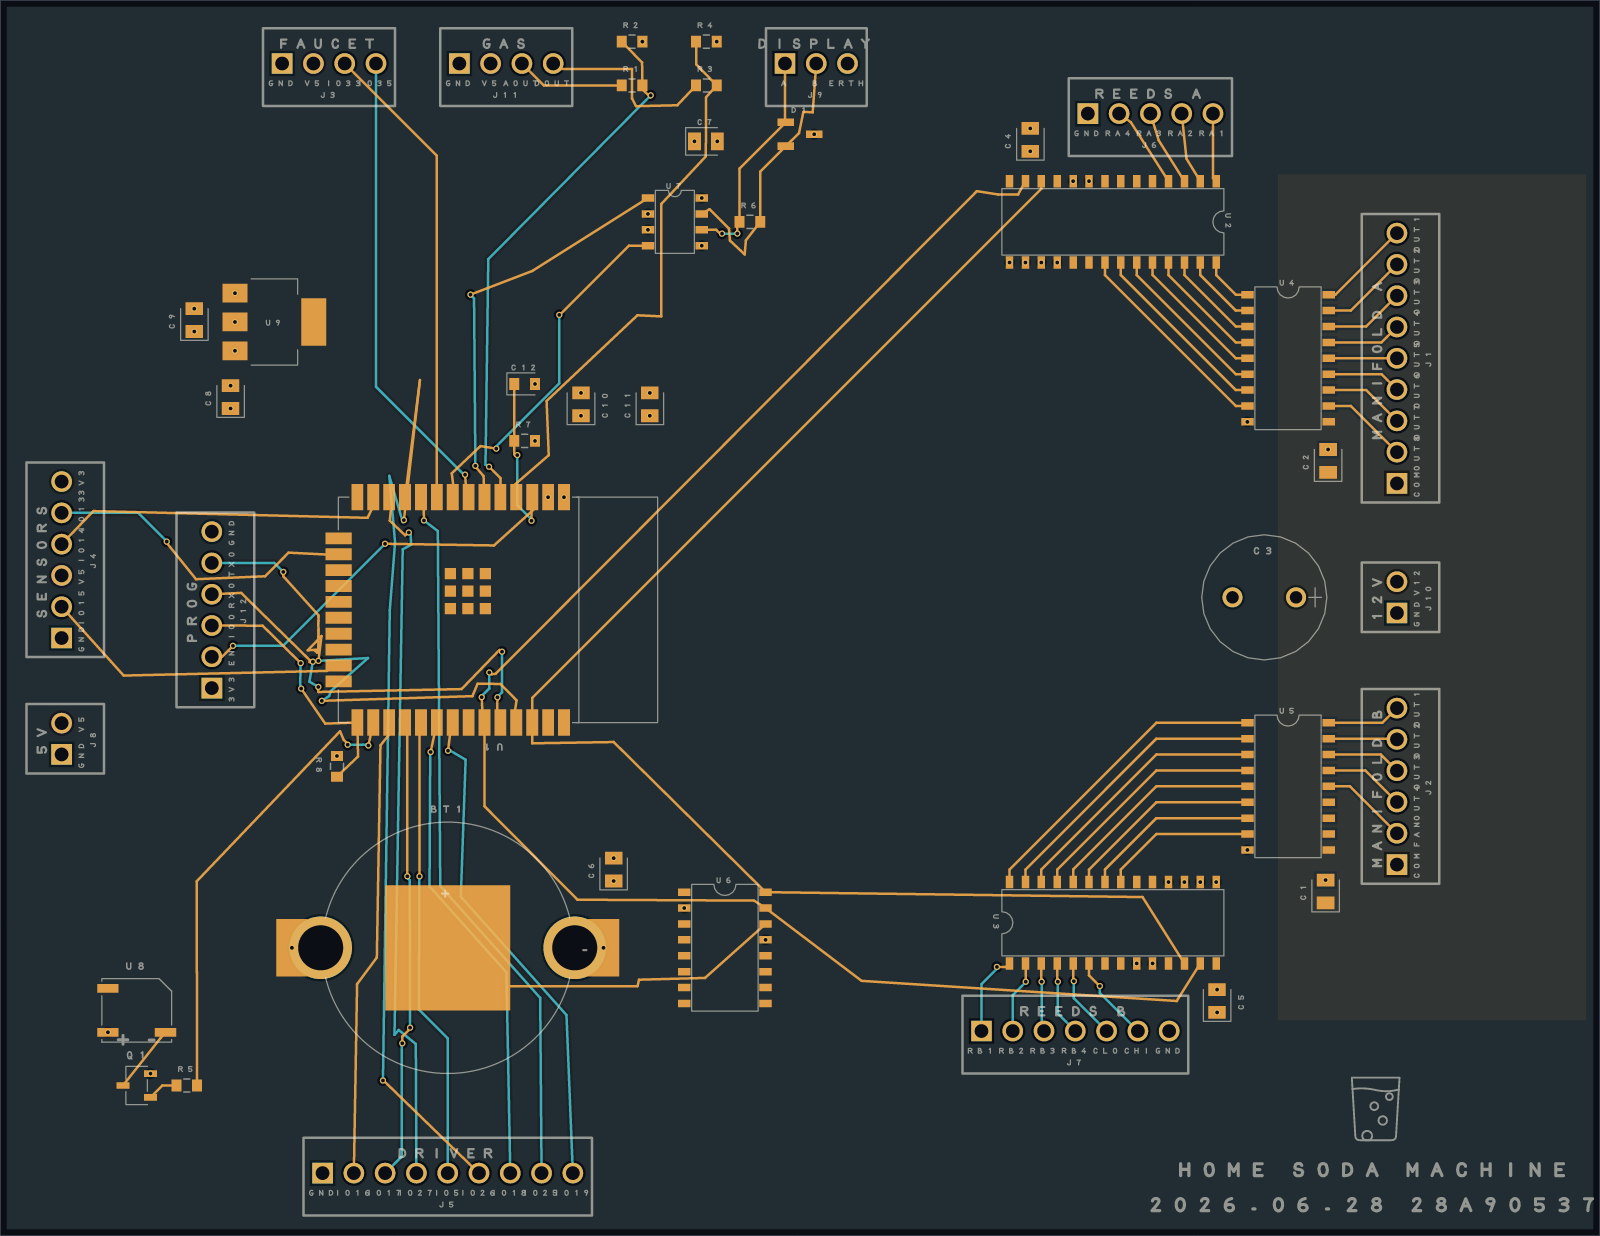
The controller board became fully wired and powered
Before today the board's chips sat placed but unwired, with no off-board connectors
After today, it has:
Every part wired and the logic powered, with off-board plug connectors for the faucet, sensors, pumps, relays, power, the two flavor manifolds, and the level reeds
New on-board parts — a piezo buzzer, divider resistors that step the gas sensor's 5-volt output down to a level the brain can read, and a drip-pan moisture connector
Copper power planes carrying the valve current a thin trace can't — a ground sheet on the back, a 12-volt sheet over the valve block — with the part labels printed on the back too, to read with the board flipped over
Flow Meter and Board
The flow meter became the real inline part
Before today the DIGITEN flow meter was a wrong L-shaped model, its inlet line floating disconnected
After today, it's the real inline puck — two coaxial 1/4-inch push-fit collets on opposite rims — and the rear-panel water line threads straight through it, bulkhead to bulkhead
The controller board took on more parts
Before today the carrier carried only its I/O-expanders and driver chips, routed and footprinted
After today, it has:
A DS3231 real-time clock and an RS485 serial transceiver (the two-wire link to the front display) placed onto the board itself, their wiring still to come
The two carbonator level reeds re-homed off the ESP32's own pins onto an I/O-expander
Every part's footprint rebuilt into one shared library, the expander-and-driver core re-routed against it
Board and Funnel Mold
The funnel's silicone mold reached its first print
Before today the mold that casts the drop-in hopper funnel in food-grade silicone was modeled but unprinted
After today, it has:
A first print that failed partway when the auto-generated supports toppled
A re-slice giving every support tower a wider, steadier base to stand through the print
A core-finishing recipe — sand, seal in clear acrylic, then a light release agent — for a clean-peeling cast
The Lite Edition's enclosure got its back panel
Before today the Lite — the flavor-only unit paired with a store-bought carbonator — had no back-wall ports
After today, it has:
A power inlet, the carbonated-water inlet, and two flavor-line ports lined up in one column through the back wall
The controller and driver electronics folded onto a single logic tray standing beside the reservoir
A real-time clock on that tray, so the machine keeps time for usage stats
The controller board got real footprints and labels
Before today the board exported fab files, but on placeholder footprints, unlabeled, in a view-only viewer
After today, it has:
Caliper-measured footprints for the I/O-expander and driver chips, in place of the placeholders
An as-it-arrives preview beside the copper view, with part labels silkscreened on
The site's board viewer made clickable — tap any pad, via, or trace to copy what it is
Board and Lite Enclosure
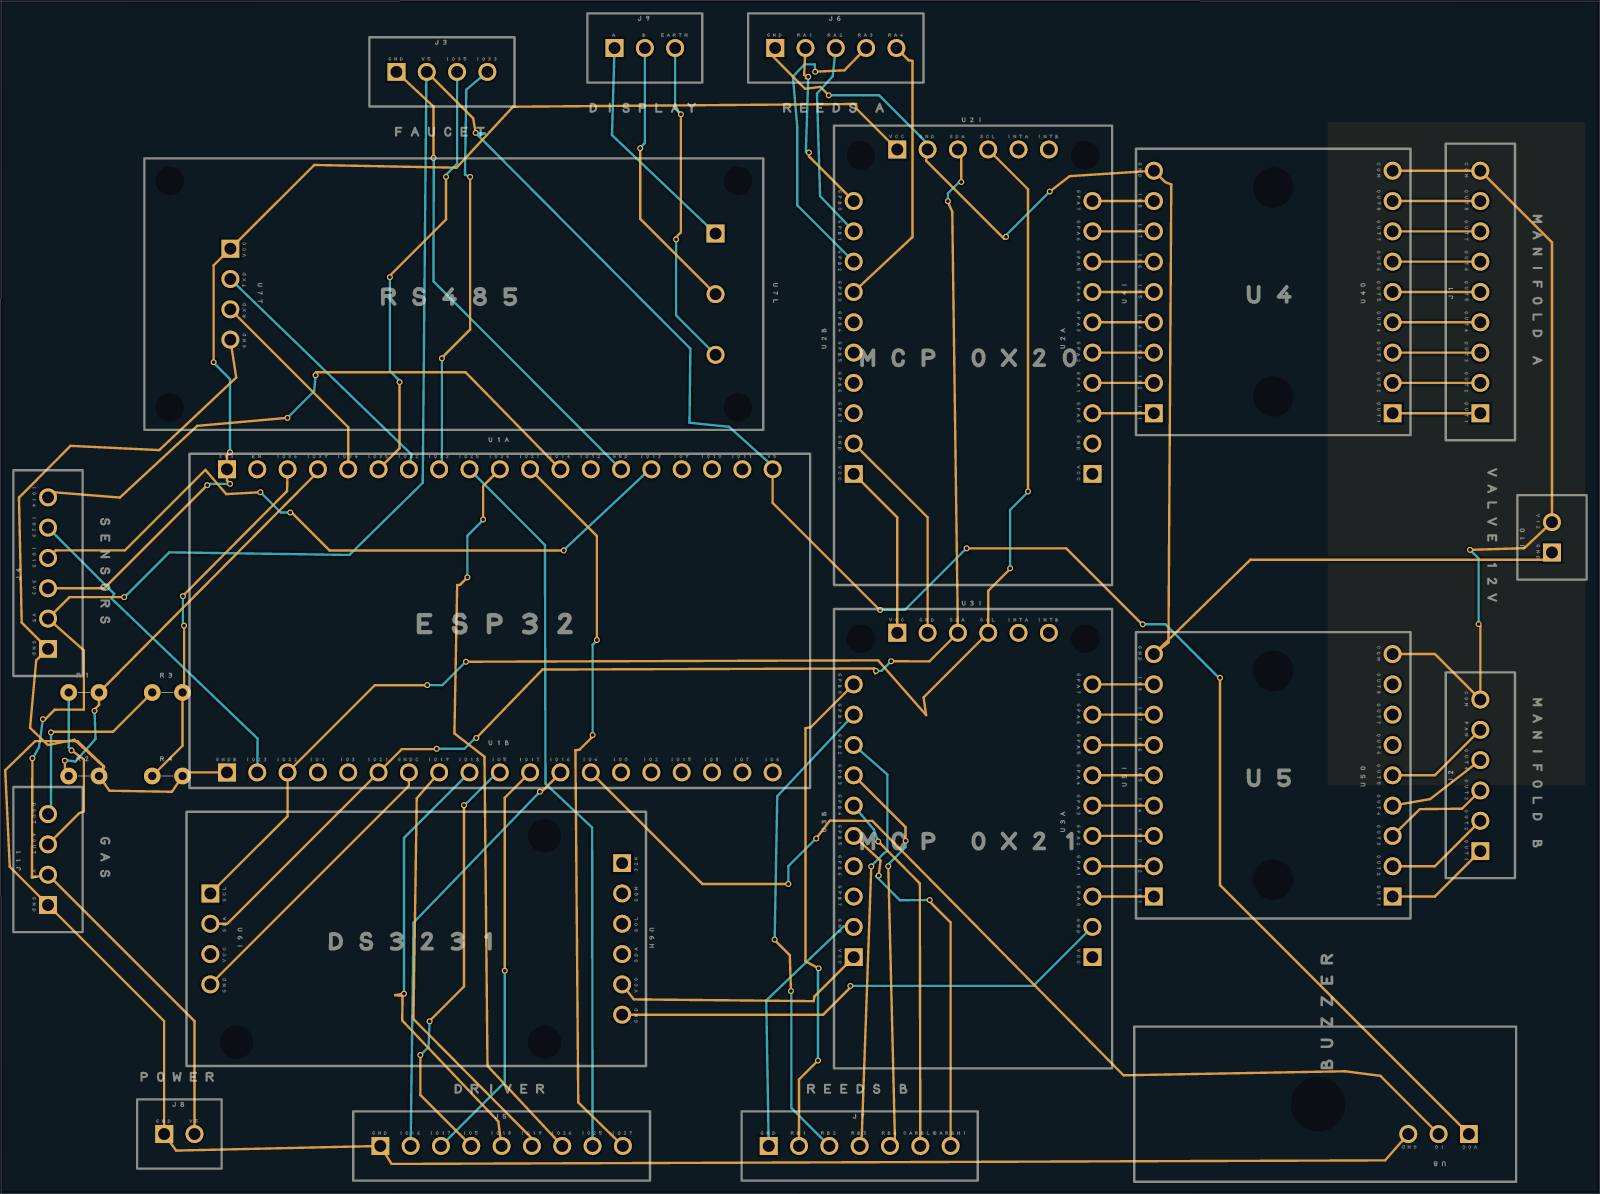
The controller board became a routed, fabbable carrier
Before today the board was a from-code placement — parts dropped from the netlist but not routed and not ready to make
After today, it has:
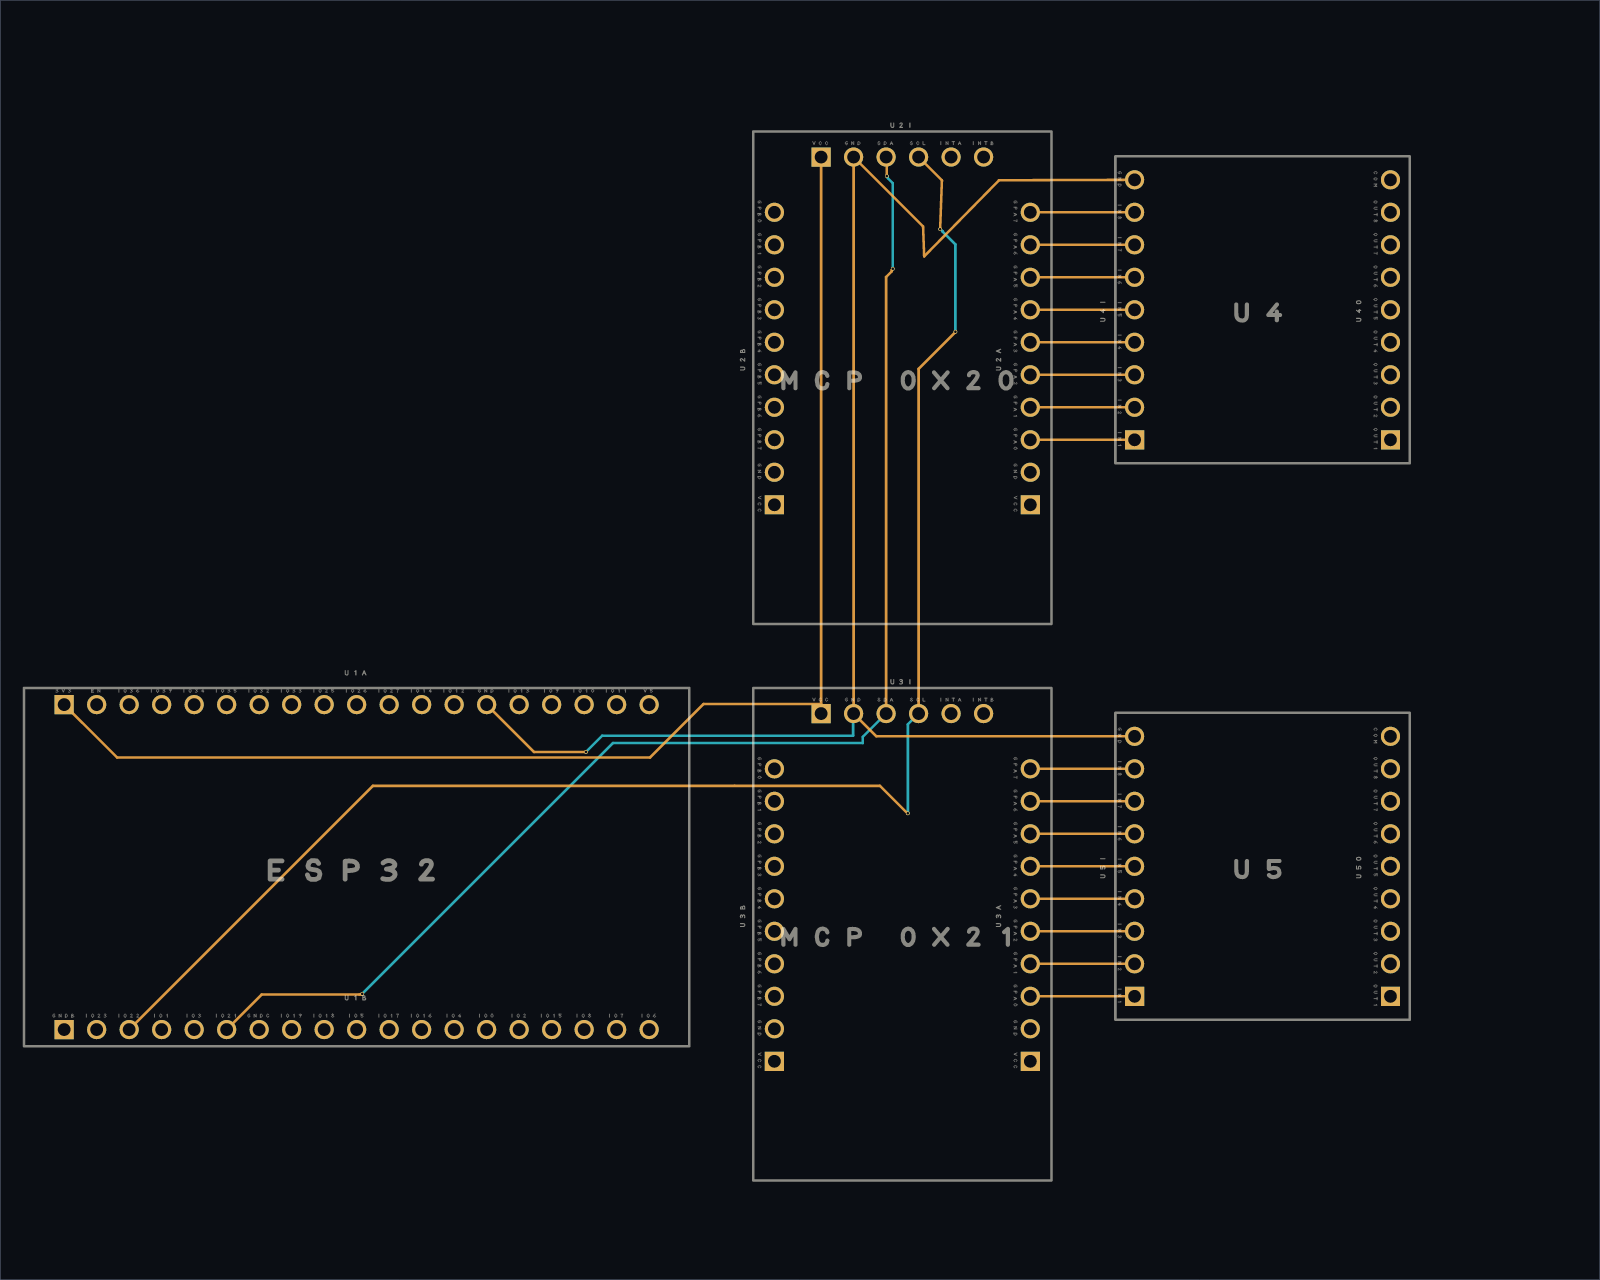
The full controller wiring routed onto a two-layer board
The design pared to one carrier — an ESP32 microcontroller socket and two I/O-expander chips on a shared two-wire bus, sinking the solenoid-valve outputs
The whole path from board code to fabrication files proven end to end
The Lite Edition's enclosure matched the integrated machine
Before today the Lite Edition — the flavor-only companion that pairs with a store-bought carbonator — sat in a plain six-walled shell
After today, it has:
The integrated machine's split-half shell — two cross-pinned halves, an angled corner facet for the touchscreen, a drop-in hopper
The contents packed and shrunk to fit, a real power-supply tray standing as a side panel in the front corner
The pour-through hopper funnel switched from printed plastic to food-grade silicone, cast in a two-piece printed mold
Electronics and Enclosure
The manifold's Tee fittings turned onto their ports
Before today the trays' Tee junctions ran butted against the valve bodies, branches unplugged
After today each Tee — the three-way fitting that joins two valve lines into one — plugs into a valve port and swings clear of the tray, the bag-circuit Tees pointing outward to the two flavor bags
The integrated machine narrowed to its cold core
Before today the pumps and valve trays crowding the right side set the box's width
After today:
The pumps pulled left and flush and the short valve trays drawn off them, so the cold core alone sets the width — about 15 mm narrower
A second power tray, turned wide and shallow, dropped into the freed right-side channel
The contents repacked against the real tray shapes, the hopper funnel's collar re-cut to seat without touching a wall
The electronics grew from one tray to three
Before today the electronics had only the single power tray — a supply, a relay, and tool-free wire splices on a flat printed frame
After today, it has:
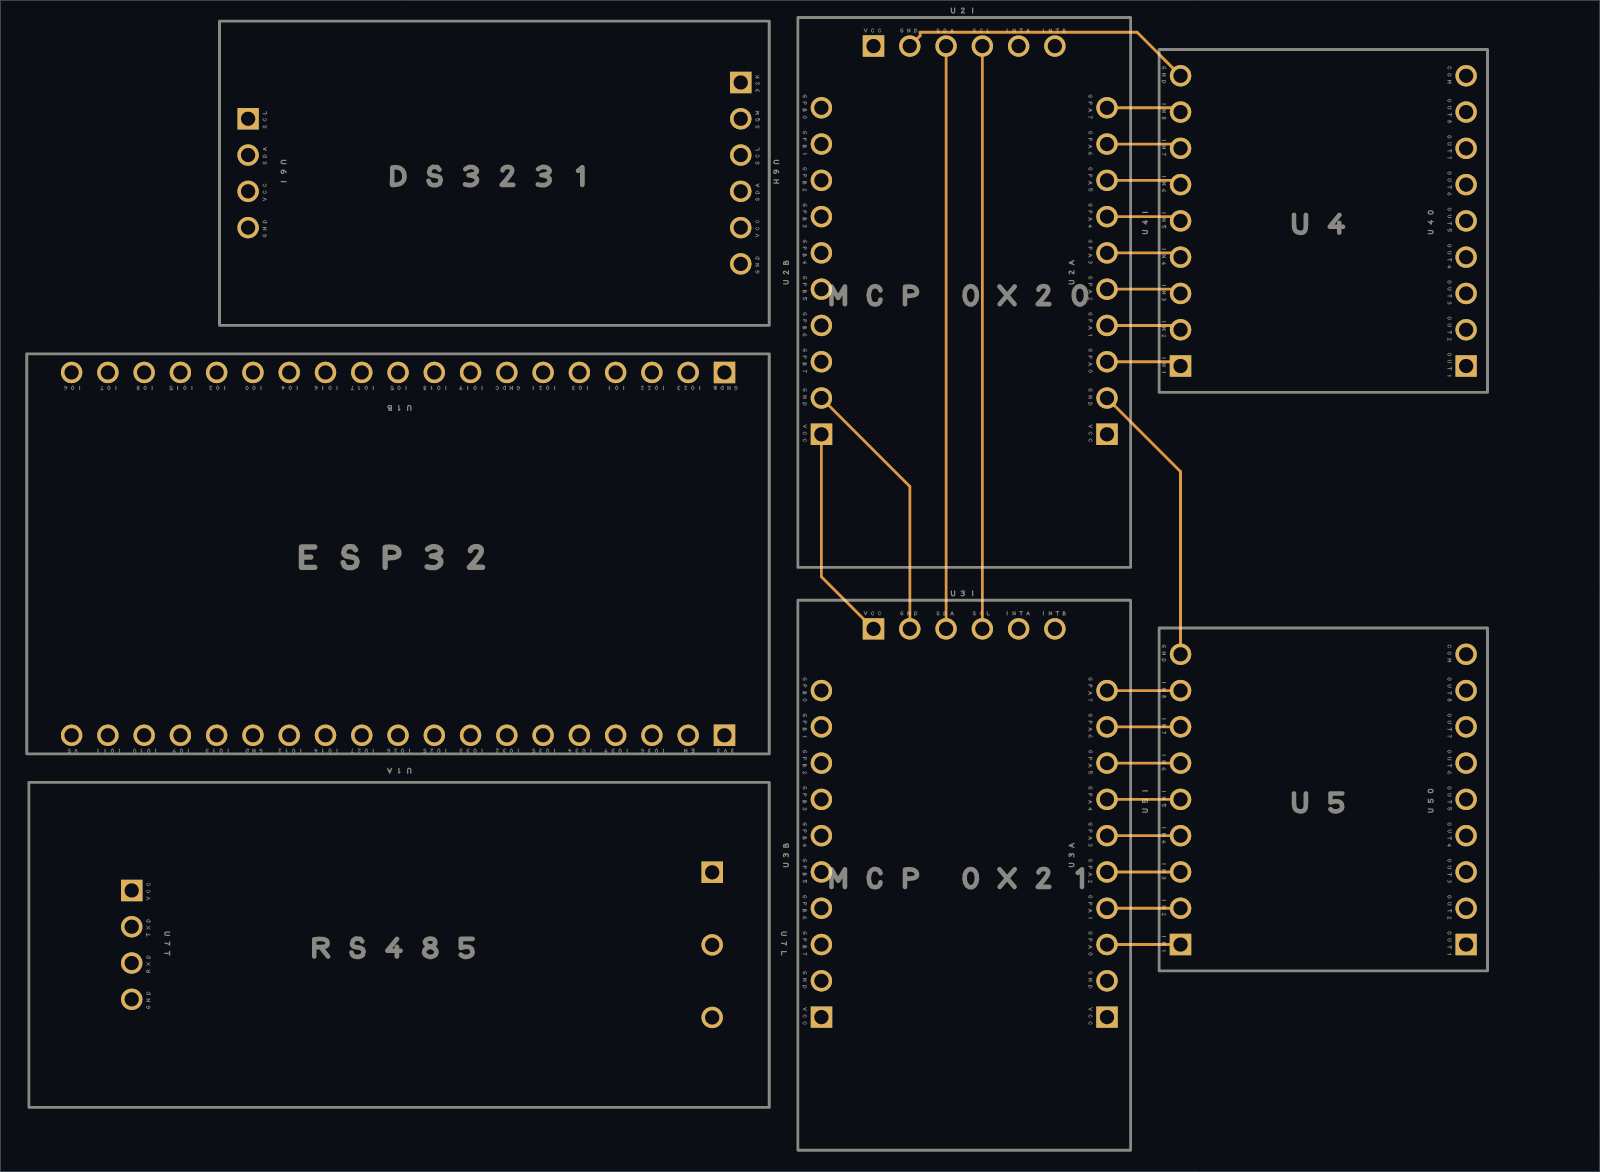
A controller tray for the logic — the ESP32 brain on a mounting-rail breakout, two MCP23017 I/O expanders, a real-time clock, and an RS485 wiring transceiver
A driver tray for the 12-volt side — an L298N motor driver, two ULN2803A driver chips, a second relay, and a power distribution block
Every board sized to its real part and screw-mounted on heat-set bosses cut to its own hole pattern
Trays and Enclosure
The electronics got their first power tray
A 12-volt power supply and a relay, press-fit into a flat printed frame
Three Wago lever-nuts (tool-free wire splices) for the AC distribution
A single-point ground tie
The flavor valves and pumps got their elbows
Before today the valve trays held bare valves and the two pumps were empty case stand-ins, no fitting on any outlet
After today, it has:
A 90° elbow (a right-angle tube fitting) on every valve and pump outlet, turning each line up out of its tray
The trays reshaped to hug the valve bodies and dividers instead of boxing them
The elbow line in the bill of materials reconciled to eighteen per machine and reordered in bulk
The integrated machine got a second, narrow shape
Before today the all-in-one kitchen machine had only the one wide box
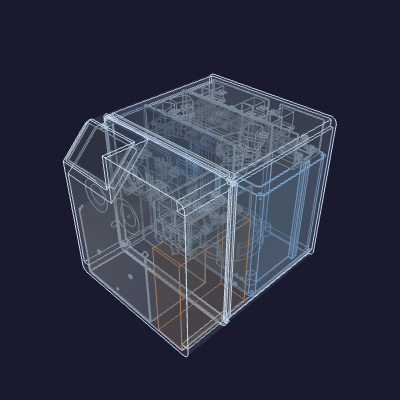
After today, it has a tall, deep, narrow twin:
The cold core, compressor, and hopper funnel each turned 90°, trading width for depth — about 22 cm wide instead of 30
The print seam moved to the middle, just ahead of the cold core, so each half fits the printer bed
The front half holding the refrigeration, pumps, display, and hopper; the back half the cold core and valve trays
Centered Glass and Tighter Box
The front-face screen sits deeper and centered
Before today the screen's pocket was 18 mm deep, the bezel registered off two edges
After today it's 19 mm deep — the display's full depth — with the glass centered on the facet and the circuit board offset behind it
The integrated machine's enclosure got shorter and repacked
Before today the box floor tracked whatever part sat lowest, pinning the seam between the two halves
After today:
The floor anchored at a fixed datum, the heavy parts standing on feet above it — so the two halves telescope ~35 mm deeper together (outer depth 377 → 342 mm)
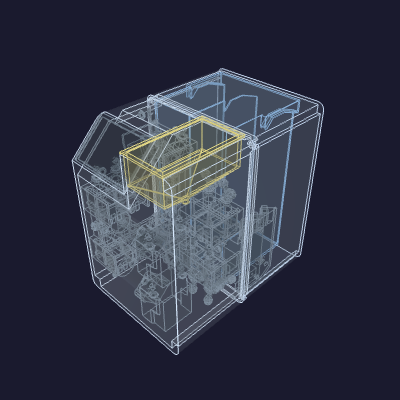
A clear channel down the front for the hopper funnel to pour through, and the back-top corner opened for the controller board's shelf
The bib-gate valve tray riding in the funnel's reserved space — a sign the box runs about one subsystem over capacity at this size